¶ Overview
This is an overall comprehensive guide for beginners on how to use Special Materials for the sole purpose of painting textures for your creations. Lessons here can obviously be applicable outside of League skins, but this will specifically be geared towards that workflow.
If you encounter any issues with this tutorial or you don’t understand part of it, you can ask for help on the Runeforge-Discord server.
¶ Required Tools
- Maya 3D Modeling software | 2023 recommended
- Ritobin Tools to convert bin files into Python files
- Any 2D editing tool Including nessecary Plugins!
An code editor of your choice, we recommend Visual Studio Code:
If you choose Visual Studio Code, you need the Python extension aswell!
Other editors work aswell, aslong as they can edit .py (Python) files.
¶ Written Guide
¶ What are Shaders and Materials?
First we need to understand what a shader and material is in order to figure out what is actually happening.
-
A shader is responsible for how a material looks and for putting colors on the screen.
-
A material defines how light hits a surface. Inputs such as a diffuse (in other words an albedo or color map), normal map, metallic/smoothness or roughness can all influence how an object with a material appears when light hits it.
In maya, different materials can have different appearances in the viewport. Every material has a certain number and types of inputs that are supported within it. For League of Legends specifically, we are always dealing with a lambert material that utilizes the base color node since everything is hand-painted without any other types of textures.

A StaticMaterialDef within the code exposes parameters (inputs such as diffuse, mask, Fresnel and its values, etc) to the artist which can be controlled normally through the interface which in this case is just whatever coding software we are using to view the code (visual studio code in this instance).
This is how riot defines parameters within a special material to add nodes beyond just the base color.
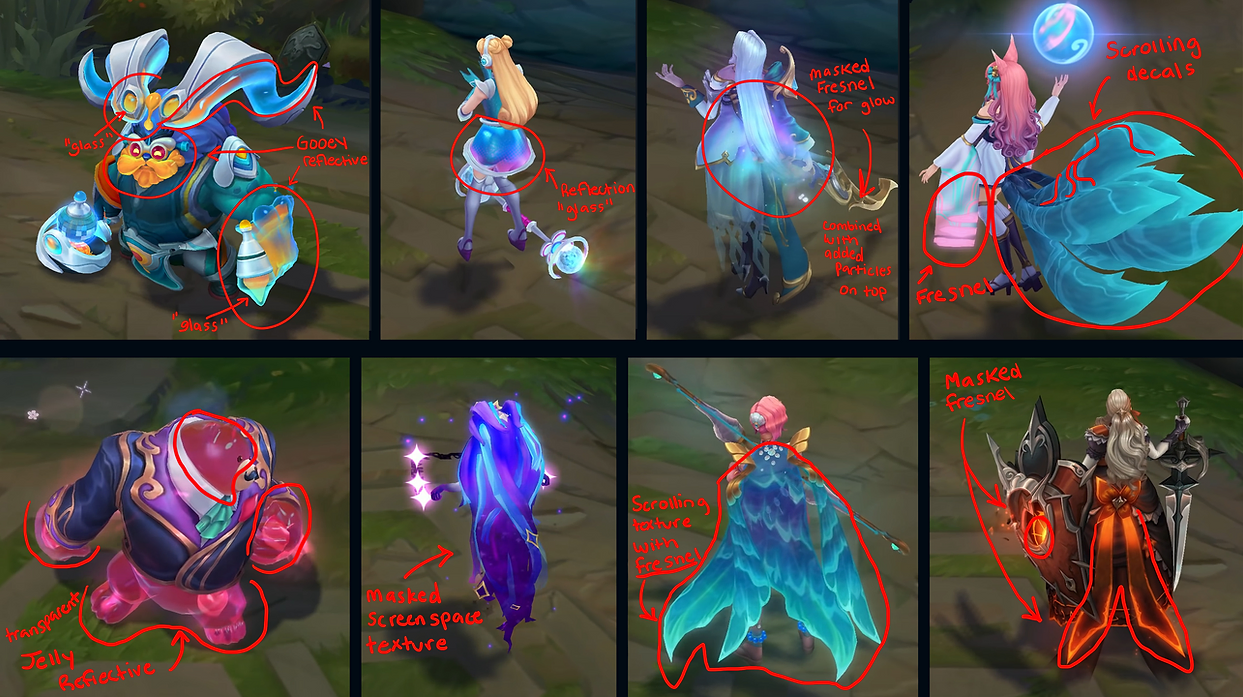
Here is an example of the code with the crystal material from Winterblessed Warwick on Ahri's tail.

Such examples of materials be found in most Space Groove skins, Cafe Cuties, Cosmic/Dark Star, Ocean Song, and High Noon just to name a few.
A fresnel gives a highlighted appearance or even a glow effect emitting from it.
A screenspace texture means that wherever you move in-game, the texture will also move. When you are standing still, this texture will not appear to move.
¶ First step to a Special Material
(Extract the WAD files using Obsidian)
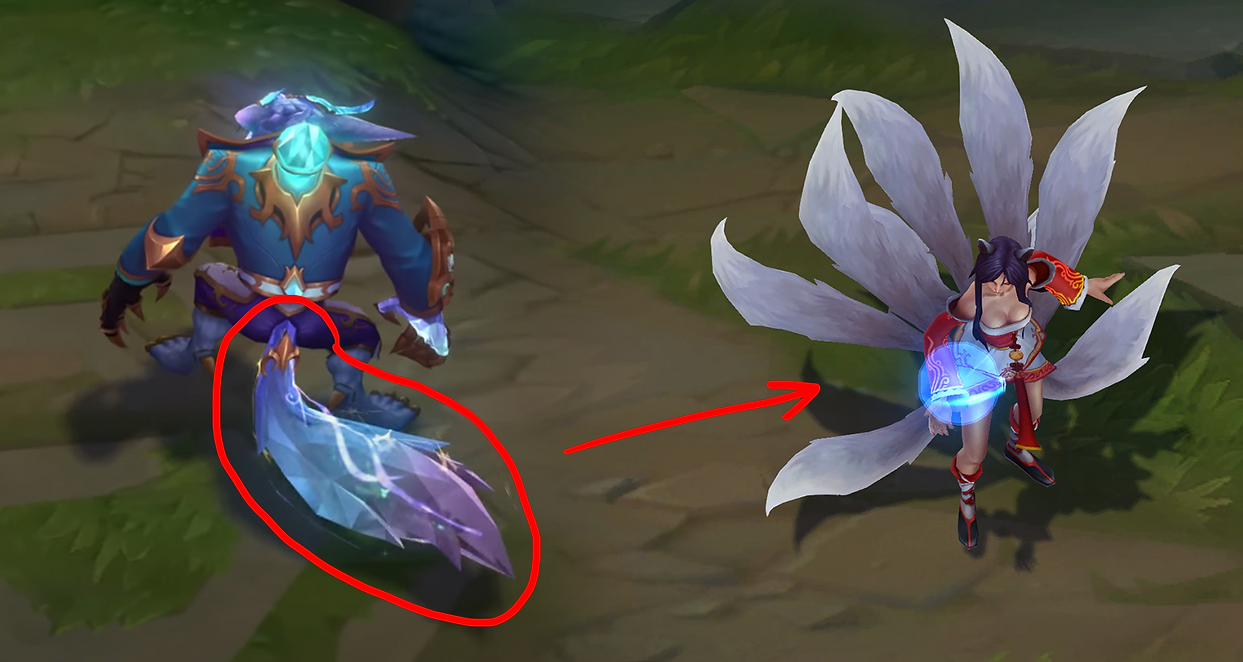
Now that we have an understanding of what the difference is between shaders and materials and how they are using in League of Legends, lets start with inputting a material from one skin into our own. In this particular case, we are going to take the Winterblessed Warwick Prestige Edition tail material and slap it onto Ahri’s entire body.
To do this we must extract Warwick’s warwick.wad.client and grab all of the assets for his skin46. I personally like to extract the entire folder and delete whatever I don’t need as opposed to only extracting the particular assets that we will need.
Be sure to also extract ahri.wad.client of course.
¶ Open your bin using Ritobin
- We need to open both Ahri’s
skin0.binlocated indata > characters > ahri > skins. - We also need to open Warwick’s
skin46bin locateddata > characters > warwick > skins.
After converting the bins using ritobin.cli, open both python files (.py) in Visual Studio code (or notepad).

Navigate to skinMeshProperties: embed = SkinMeshDataProperties { in both bins.
You only need to copy the bodydiamond SkinMeshDataProperties_MaterialOverride from Warwick directly underneath Ahri’s reflectionFresnelcolor.
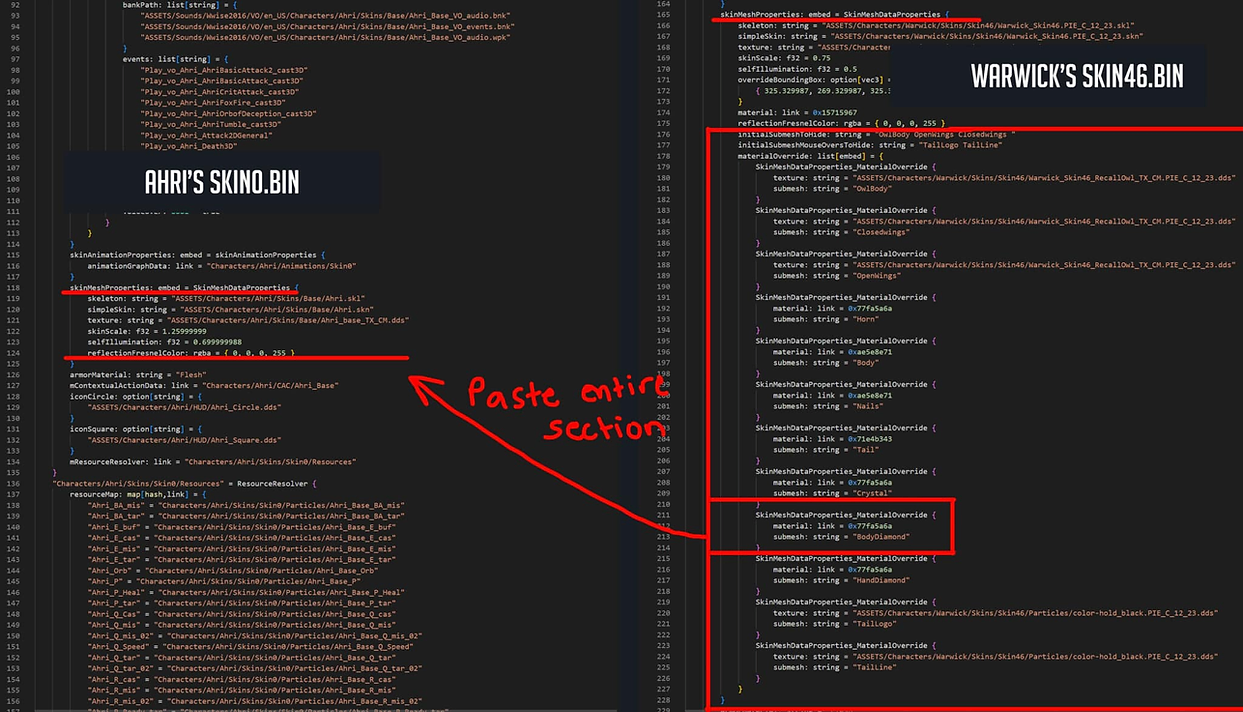
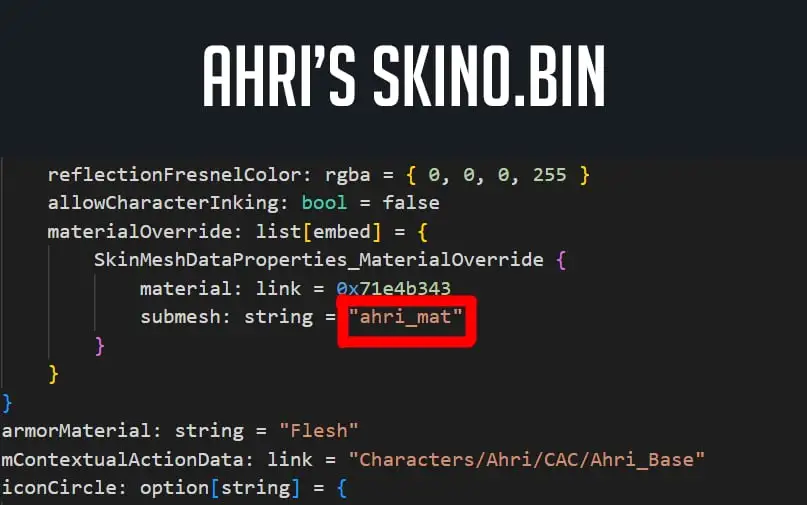
If you’d like, you can rename bodydiamond to anything you would like. In this instance, I have named it ahri_mat.
¶ Paste Static Material Definition into your bin
Now that we have defined which material within maya is going to be using the diamond effect, we need to define the parameters of what that material is within Ahri’s bin.
So now we copy Warwick’s StaticMaterialDef named Characters/Warwick/Skins/Skin46/Materials/Prestige_Tail_Diamond_inst and paste it underneath the bracket below mResourceResolver in Ahri’s bin.
Make sure to change the diffuse texture in Ahri’s bin to her default texture!

Now we’re done with the bins!
Let’s move onto setting up the textures.
¶ Setting up the texture mask
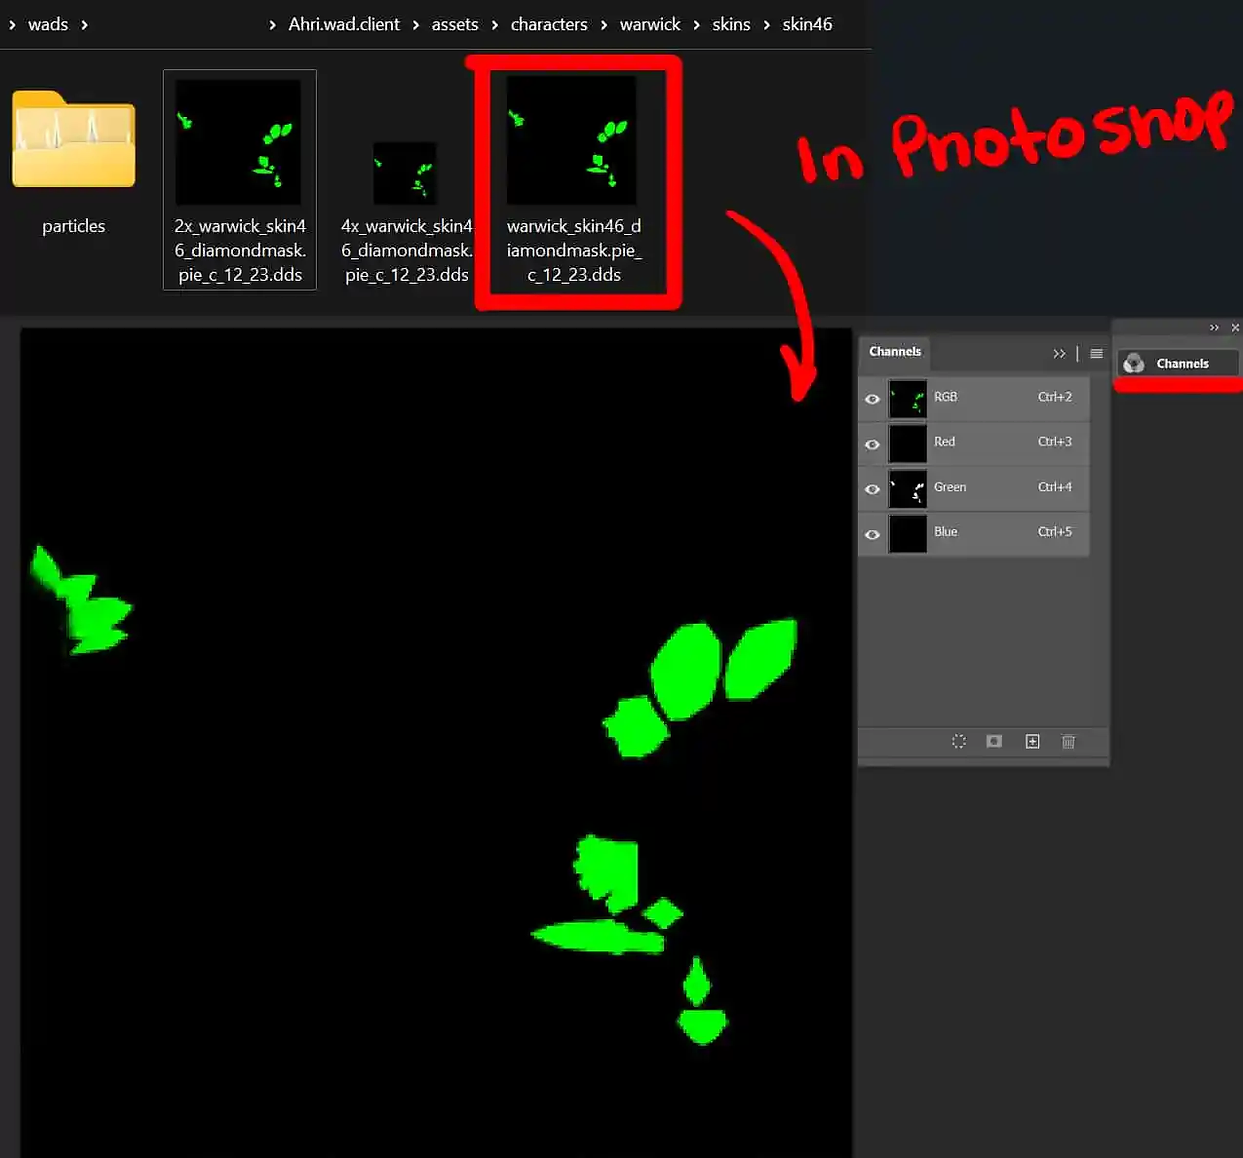
You will need to copy over Warwick’s asset > character file for his skin 46 to Ahri’s wad.
For this material we only have to deal with one mask. This particular mask only uses the green channel. The proper way to paint within these types of channels is to go in and select one of the following RGB channels and paint within it. You can also copy and paste black and white images to create a mask within the channel. Since we only have to worry about the green channel here, we can actually just color pick the green and paint within the RGB channel. Since I want Ahri’s whole body to be using this material, I’ve filled the entire texture with green.
Note: For most materials, it is likely that there will be a mask. Be mindful of the parameters which are listed in the code and look up all of the textures. Masks do not always appear as a green color but sometimes red or blue. They can even simply be black and white or completely transparent aside from the masked out areas. There's no particular reason for the difference as the artists working on the materials decided this was the way that made sense for them. A texture that does use multiple colors in RGB however is likely to utilize the different channels as different textures for the other parameters in the shader. Be mindful that erasing a channel may make you miss out on something visual.
A material with a mask will not overlap with any other material that doesn’t have the link in the bin. “Ahri_mat” is the only material this diamond effect will take place. If I have another material for her hair or tails specifically without link then I would not need to cover those areas in black for this texture. Masks are usually only necessary if the entire character is one material OR you want to create gradient areas where the material will appear.
¶ Setting up the Model
Now we’re done with the texture!
Let’s move onto setting up the model.
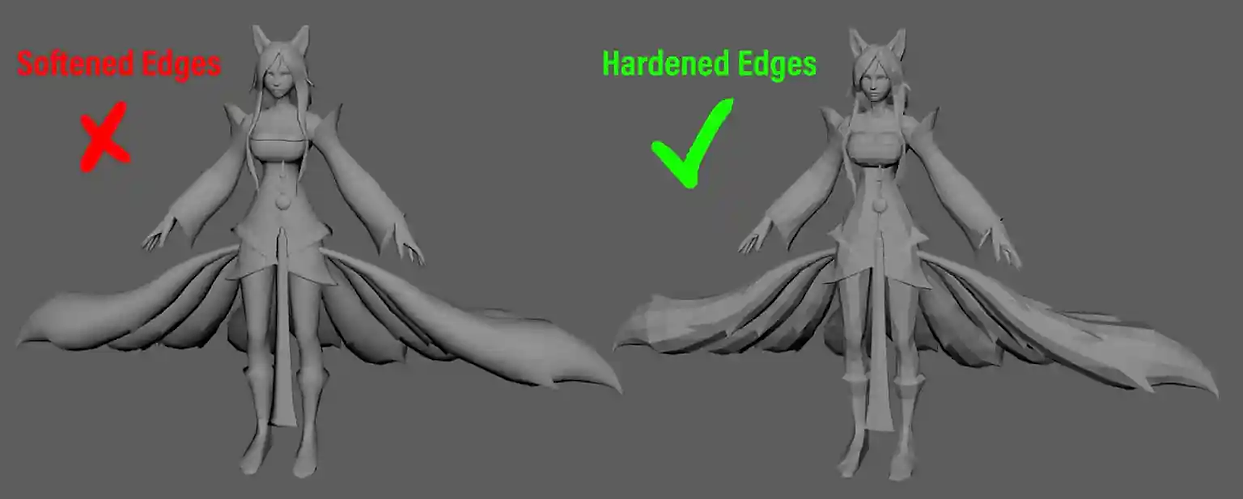
Note: Most materials don’t need hardened edges like we will cover in this section. The materials from Ocean Song, Dark Star/Cosmic, and Space Groove can simply use softened and merged vertices. You only need to apply a separate material as we’ve covered in the tutorial prior. However, most diamond-like materials as you will find in most recent prestige skins like Janna, Warwick, and even KDA ALL OUT Ahri will need to have this part in order to look proper in-game. The best way to find out if a material needs this is to check the original skin that you are pulling from in Maya and see if the vertices are unmerged.
Once you’ve loaded your skin in maya, separate the object that you want to have the diamond material if you need to. (If you don’t want to separate, you can select by UVs). In this instance, I am making Ahri’s entire body a diamond material, so that won’t be necessary for me. Select ALL of the vertices within the object and detach (edit mesh > detach).

Once the vertices are detached, you can soften edges to double check that they are in fact detached.
Your model should look like it has hard edges across every polygon
Select the object and set the material to whatever you named it to in your bin. In my case, ahri_mat.
Now you will attach the skeleton and weight and proceed with the normal skin-creation process.
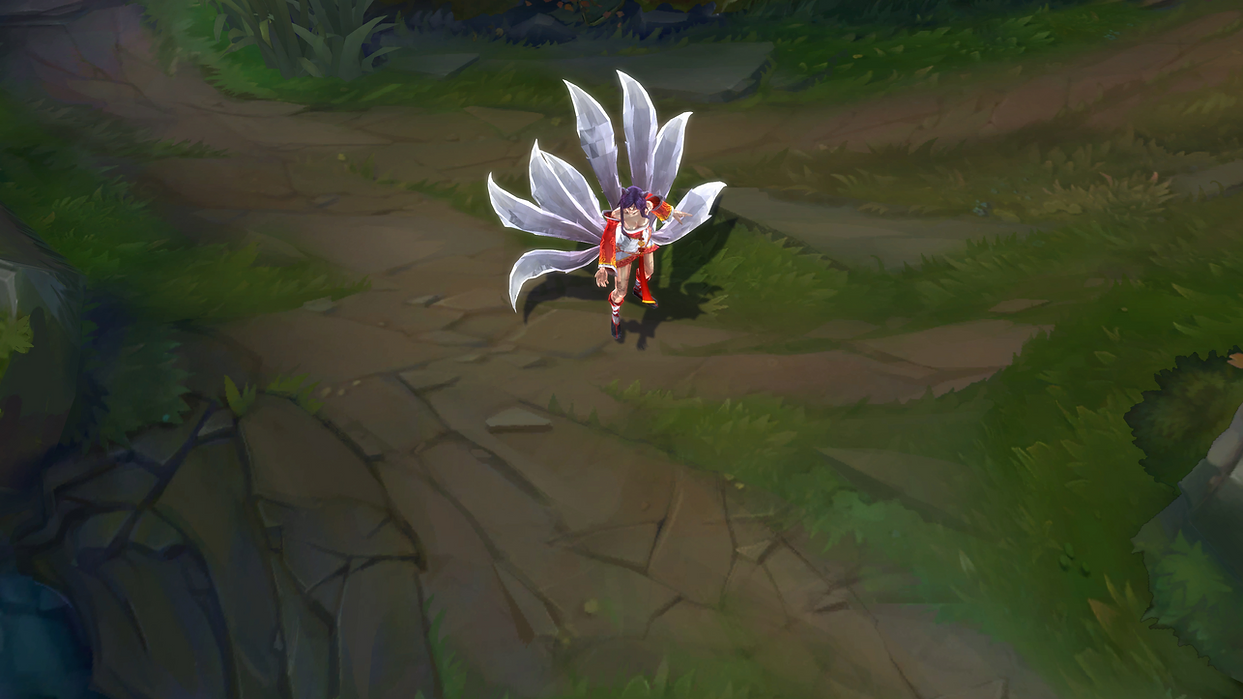
After exporting your skn/skl, you are ready to load in-game. If you followed the tutorial thoroughly and accurately, you should get the exact results you desire.
¶ Sources
- Bearded Shepherd