The first section of this tutorial uses LtMAO, specifically its explorer contexts. Follow the instructions here to install LtMAO and here for enabling explorer contexts.
Use the second section of this tutorial to fix without LtMAO, or if the first section causes a crash or invisible textures.
Riot is in the process of updating League's main texture file format from DDS to their own TEX format, updating groups of champions in alphabetical order. This causes mods to appear broken as Riot's bins are now using TEX files, which your mod does not have.
¶ Update Textures With LtMAO
¶ 1. Extract WAD from CSLOL Installed Folder
Find your mod's WAD file under CSLOL's installed folder at CSLOL\installed\Mod_Name\WAD.
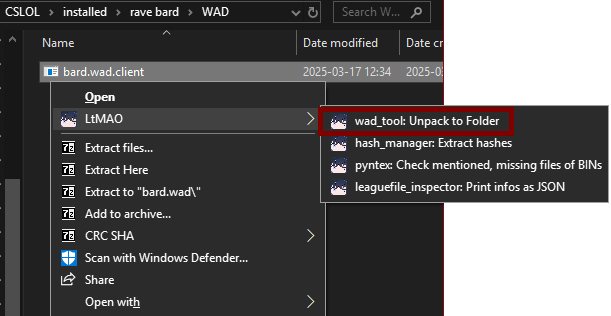
¶ 2. Locate Texture Files and Convert DDS to TEX
- First, you can delete alternate files, i.e., files beginning with
4x_or2x_because TEX does not need alternate files to display at lower texture settings. - Convert each DDS file to TEX by right clicking it, selecting
LtMAOthen clickRitoddstex: Convert To TEX. - After you convert your files to TEX, you can delete any remaining DDS files. If LtMAO gives any errors like
Unsupported DDS format, try converting to PNG using the same context menu, back to DDS, and finally to TEX. You can delete your remaining PNG files alongside the DDS files. - If there is a folder labeled
particles, you need to convert DDS files there as well.

¶ 3. Repack Your WAD and Reload CSLOL


This should be it. If you did everything right, your textures should look normal again in game.

¶ Bulk Fix Large Mods (No LtMAO)
For crashing or invisible skins after LtMAO converting see step 3 and 4.
You will need at least tex2dds by Morilli and it's a good idea to get texconv by Microsoft. These are both small CLI utilities. Install both of these to a folder you can remember later.
Please read this section in its entirety before trying to follow the instructions. You may inadvertantly do something by simply following along without having fully understood what you're doing. If you have problems at any stage in this process, go back and re-read this entire section and make sure you haven’t missed anything.
This tutorial uses CMD, but the commands are simple enough to easily rework for use with any other command processor like PowerShell.
¶ 1. Extract Your Mod and It's WAD File
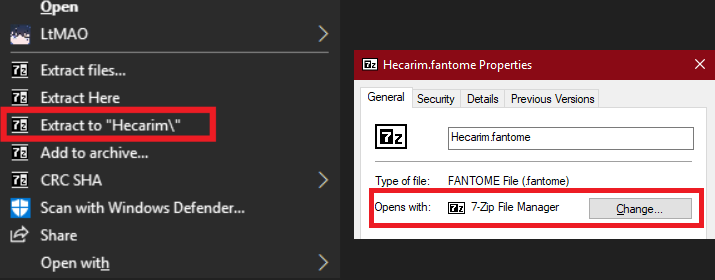
Extract your mod's Fantome or Zip file to a folder using 7-Zip or WinRAR. To add 7-Zip options to your context menu follow this guide Fix 7-Zip Option Missing From Context Menu. Additionally, for easier access to your mod's files in the future, set Fantome files to open by default with 7-Zip or WinRAR. (Do not just rename the fantome to .zip, this is a huge waste of time.)
Under your extracted folder, Mod_Name\WAD you will find all of your mod's files compressed within a single WAD file, labeled Champion.wad.client or Champion.en_US.wad.client. Extract a WAD by dragging it onto one of CSLOL's tools called wad-extract, found in your CSLOL directory under CSLOL\cslol-tools\wad-extract. This extracts your mod's files into a folder called Champion.wad next to your WAD file. It may be necessary to have updated hashes and their full pathnames in your wad-extract directory, although some files may be custom or no known hash regardless. Unknown hashes will not prevent you from converting or editing your files, but without them you may inadvertently edit files, such as any QWER+P icons because they are largely indistinguishable while not labeled and in their directory.
Similar to the technique used above to open Fantomes with 7-Zip, you can do the same for WAD files with the extension
.clientandwad-extract. Now, double clicking a WAD file haswad-extractextract it into a folder next to your WAD.
¶ 2. Convert DDS to TEX in Bulk Without LtMAO
Before bulk converting, you should understand a few details about TEX and DDS files in league. As of the 25.5 patch,
- Only champions who's name begin with
A-Ruse TEX files for their textures and particles. This means AoE converting with a loop will incorrectly convert some of these files, ex., if a Caitlyn mod uses textures in a Zed folder. This is less common, and a more specific command can be used to work around this.- Most files found under
assets\shareddo not need to be TEX and should be left alone if they are.- Every champion, even
A-Rstill uses DDS files for their QWER+P icons (found underchamp.wad\assets\characters\champ\hud\icons2d).- Every champion uses TEX for their loadscreen found in the main folder and in game HUD icons found in
champ.wad\assets\characters\champ\hud.
First, you need to add both tex2dds and texconv to your Windows path in order to use them from within any directory, otherwise, they will only be available while inside the folder they were installed to. To do this, search env var from your Windows start menu and click Edit the system environment variables or follow this video guide since default windows search is garbage.
Using tex2dds manually by dragging each file, from the cli like tex2dds file.tex to create file.dds, or using LtMAO's context menu is impractical.
Navigate inside of your champion.wad folder, press Ctrl+L or click to focus the address bar in file explorer, type cmd, and press enter to open a command prompt at your current location. Your CMD path should end with champ.wad.

To convert every single DDS file in a directory to TEX, or vice versa, shrimply run this for command inside champ.wad. Make sure you understand the four highlighted notes above.
for /R %I in (*dds) do tex2dds "%I" If this fails with an error, appears blank/white in game, or wont load and crashes, see step 3 and 4.
foris the basic loop command used in CMD to iterate on a conditional set of files./Ris a for loop switch that indicates to loop recursively.%Irepresents the currently active file.(*dds)uses the*wildcard to signify a file that begins with literally anything and ends indds.
Once you're comfortable with the command line, append
&& del "%I"in order to delete your DDS file after converting to TEX. Alternatively, if you would prefer to not delete anything rapidly, wait until after you have updated your mod and runfor /R %I in (*dds) do del "%I"to delete any remaining DDS files. Again, make sure you know what files exist in your mod and whether they may need to remain as DDS.
Next, on the same command line, run for /R %I in (4x*tex,2x*tex,4x*dds,2x*dds) do del "%I" to delete your now redundant 4x_ and 2x_ alternative texture files.
If this completed successfully, you can go to Step 5 to remake your WAD file and try it in game.
¶ 3. Optional: Fix Bad DDS Pixel Format
There are two requirements for a DDS file to correctly convert to a league TEX file. It must be in a DXT1, DXT5, or uncompressed BGRA8 format and it's X and Y dimensions must both be multiples of 4.
This step can also be used to pre-fix any potentially bad DDS files before converting them to TEX.
In most cases, simply converting all DDS files to TEX with tex2dds will have worked, but if both of the above criteria are not met, your TEX file will either simply fail to convert and produce an error such as Error: dds file needs to be in either DXT1, DXT5 or uncompressed BGRA8 format!, appear invisible or whited out in game, or fail to load and crash League.
- Type
texconvwith no options to see all available switches.
Now, run texconv -f BC3_UNORM -r:keep -y *dds to iterate on all DDS files below your current directory. If you mess this up, just delete the Champ.wad folder and re-extract the WAD file to start over.
-fis the output pixel format flag andBC3_UNORMis the specified format. All of the formats are listed at the bottom of the texconv help output.-ris texconv's recursive switch.:keepleaves the output file in the same spot as it was before conversion, otherwise texconv will put the converted file into your current directory (bad!)-yoverwrites your old/input file with the converted/output file.*ddsuses a CMD wildcard to provide texconv with every file that begins with anything and ends indds.

While using
texconv, it is important you are not in any random directory while using it because-rcombined with the*wildcard will tell texconv to do every file under you. If you want to work on a directory you are not inside of, you need to provide an output DIRECTORY to texconv with-oEx.,texconv -f BC3_UNORM -r:keep -y -o Mod_Name\folder" "Mod_Name\folder\*dds"
Until you understand this command you should make sure you are underChamp.wadlike the above image!
¶ 4. Optional: Fix Bad DDS Dimension(s)
This section is slightly more nuanced and may seem confusing, but in the end it is 1-2 commands and little reading.
After confirming your DDS files are in the BC3_UNORM format and converting them to TEX, they may still fail to appear as expected in game. This is uncommon, and is because the X & Y coordinates of your DDS file were not a multiple of 4 before converting to TEX. To confirm this, use texdiag from the initial texconv link and run texdiag info "file.dds". The output will include various information about your input file.
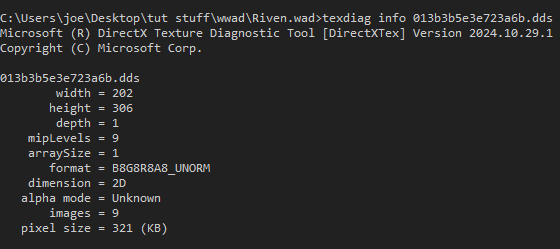
The above image is a great example of a DDS file that might look like it has proper dimensions because of the even numbers and therefore should not create issues, but instead, it will 1. not not convert to TEX because of the pixel format, and 2. even if the format was compatible with tex2dds, tex2dds would simply create a TEX file that does not work in game because of it's improper dimensions.
To fix this file you need to convert the DDS' pixel format to BC3_UNORM as explained in Step 3, and adjust the dimensions. To adjust dimensions, use the -w and -h switches for width and height, so texconv -w 300 -h 304 -y "file.dds". If the offending file is a loadscreen, their default dimensions are 308x560.
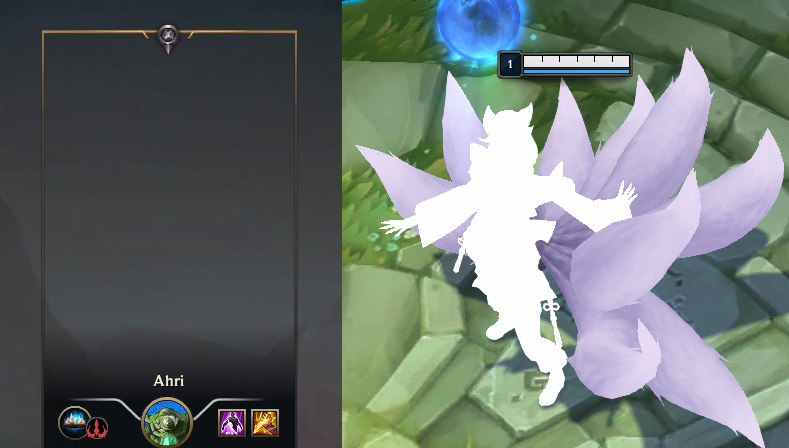
Do note that adjusting—and especially ever so slightly changing the aspect ratio of very small files—such as an icon with the size 111x94 to 112x96 will create very apparent resampling artifacts. In order to preserve image quality, it may be better to actually crop pixels from a specific side of the image using a photo editor such as Paint.NET. Cropping instead of resizing is usually only necessary for for static images like icons or decals with text, whereas resizing an erroneous mod's champion texture from 258x256 to 256x256 is unlikely to produce noticeable discrepancies in game. If the texture is a part of the game involving heavy movement or is otherwise not a static icon, then any resampling blur will not be noticeable in the final TEX texture.

As seen in the image above, the right side image, having been resized to 112x96, has very visible artifacting, especially around it's jagged border. If I were to instead crop or extend the the original image's canvas (in accordance with the proper TEX dimensions), it will likely have no or extremely minor adjustments in game; and completely avoid the risk of resample blur ruining the image. The results of cropping can vary on the type of image, for example, an image used as an animation graphic like kayn_spritesatlas_02; even cropping or adding only a single pixel may completely alter it's animation in game.
Remember, if the input file provided to
texconvis not in your current directory, i.e., the input file"path\path\*.dds", you need to provide an output path,-o "path\path"before. Also note thattexconvwill only output to preexisting directories.
If you are unable to find the broken file(s) manually there is simple way to find them.
- Run
texdiag info -r *dds>>%desktop%\fixdds_allinfo.txt, into a text file. Note%desktop%is an example path, change that directory and filename to one for your drive. - Next, do
texdiag info -r *dds | findstr "width height">>%desktop%\fixdds_sizes.txtwhich uses FINDSTR to filter just the lines including width and height information. - Open
sizes.txtand globally (ie, not just concurrently) remove duplicate lines with your text editor's tool,Ctrl+Shift+Din Notepad++. This creates a brief list of each unique dimension from your pool of DDS files.
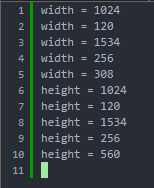
As you can see from this list, there are two obvious values that are not compatible with TEX. Using this information you can go to all.txt and search your faulty height and/or width to find the file(s) with incorrect dimensions.
This is a very underdeveloped shortcut to finding bad files and with better filters and some conditionals you could easily make something that prints out offending files instead of finding them manually.
¶ 5. Remake WAD and Repack Mod File
Before remaking your mod, test your fix by simply dragging your Champ.wad folder (not .client file) into CSLOL. It will load normally if you drag the correct folder, and it's name will be Champion with no description or other metadata information.
Once you confirm your fix works as expected, follow similar steps as before when you extracted your WAD.
- Drag the
Champ.wadontowad-make. This will overwrite theChamp.wad.clientfile. - Delete the
Champ.wadfolder. - Go up a directory, select both META and WAD, right click, and click "Add to archive". If this is not available, follow this guide Fix 7-Zip Option Missing From Context Menu.
You can also use 7-Zip from CMD assuming it's part of your PATH. To make a structurally correct mod use7z a "Mod_Name.zip" META WAD RAWwhile inside the directory with those folders leaving you with a zip file as your mod next to your WAD/META/RAW folders. You need to know exactly where you are when you run this or make the zip manually because if you nest or otherwise make an incorrect mod structure, upon importing the mod into CSLOL it will simply error out. - After you have successfully made your Zip file, and optionally rename the extension to
fantomefor fun, you can use your mod in CSLOL. A Fantome file is a Zip file with additional information about the file, and is unnecessary at all. - Profit.
¶ Sources
- Yuumi
- Moga - Discord