¶ Photoshop
Photoshop is a subscription based tool to edit 2D files.
In order to edit dds files, you need to install a corresponding plugin.
¶ Intel Texture Works
¶ Download
Head to Intel's website on the link below and click the download link at the top of the page.
When redirected to the second page click the ZIP button at the top.
¶ Installation
- Close Photoshop.
- Extract the plugin .zip file you downloaded.
- Copy the desired plugin from one of the folders depending on if you are using a 64bit or a 32bit version of windows:
.../IntelTextureWorks_1.0.4\Plugins\x64\IntelTextureWorks.8bi
.../IntelTextureWorks_1.0.4\Plugins\Win32\IntelTextureWorks.8bi - Paste the plugin into the appropriate Photoshop Plugin folder.
C:\Program Files\Adobe\Adobe Photoshop 2024\Required\Plug-Ins\File Formats
C:\Program Files\Adobe\Adobe Photoshop CS6 (64 Bit)\Plug-ins\File Formats - Copy the cubemap scripts from:
.../IntelTextureWorks_1.0.4\PhotoshopScripts\IntelTextureWorks-ConvertCubeMap.jsx
.../IntelTextureWorks_1.0.4\PhotoshopScripts\IntelTextureWorks-CubeMapGaussianBlur.jsx - Paste the cubemap scripts into:
C:\Program Files\Adobe Photoshop 2024\Presets\Scripts
¶ Saving files
- File > Save As
- Select "Save as type" > Intel® Texture Works (*.DDS;*.DDS)
- Navigate to the location where you want the file to be saved.
- Assign file name.
- Save.
- Inside the plugin options select these settings:
- Texture Type: Color + Alpha
- Compression: BC3 8bpp (Linear)
- Mip Maps: None
- You can make a preset of these settings to use every time, name the preset and press Save at the top.
- Press OK.
¶ Nvidia Texture Tools
¶ Download
Scroll down and download the Photoshop extension. You need a developer account for that, but you can simply create one following the site's instructions.
¶ Installation
- Close Photoshop
- Double click the installer and follow the instruction given. It usually automatically detects your Photoshop file location
- Once the installation is finished you can re-open Photoshop and you're done.
¶ Export files as .dds
Once you're done editing your file you need to export it as .dds.
- Click
File>>Save asOR CTRL + Shift + S - Select Filetype:
DDS - NVIDIA Texture Tools Exporter (*.DDS;*.DDS)
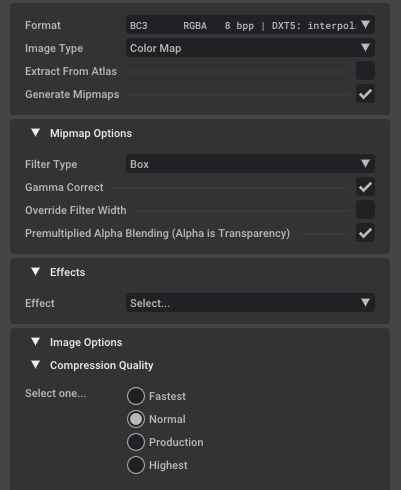
In the exporter settings you need to follow the instruction given in your specific guide! The following instructions are the standard settings used for most but not all .dds files.
- Format:
BC3 RGBA 8bpp | DXT5: interpolated alpha - Compression Quality:
Highest
Leave the rest as it is >> Click Save. Done.

¶ Simple DDS Plugin
This plugin is a generic .dds plugin and has no name.
Its simplicity makes it easy to use and fast to save files.
It's useful when doing batch export as it doesn't require you to confirm file saving.
¶ Download
¶ Installation
Simply download the file and place it in the following address:
C:\Program Files\Adobe\Adobe Photoshop 2024\Required\Plug-Ins\File Formats
¶ Saving Files
- File > Save As
- Select "Save as type" > DDS (*.DDS;*.DDS)
- Navigate to the location where you want the file to be saved.
- Assign file name.
- Save.
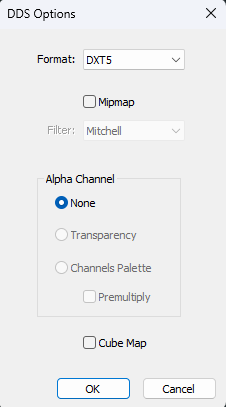
- Inside the plugin options select Format to be DXT5:
- Press OK.
